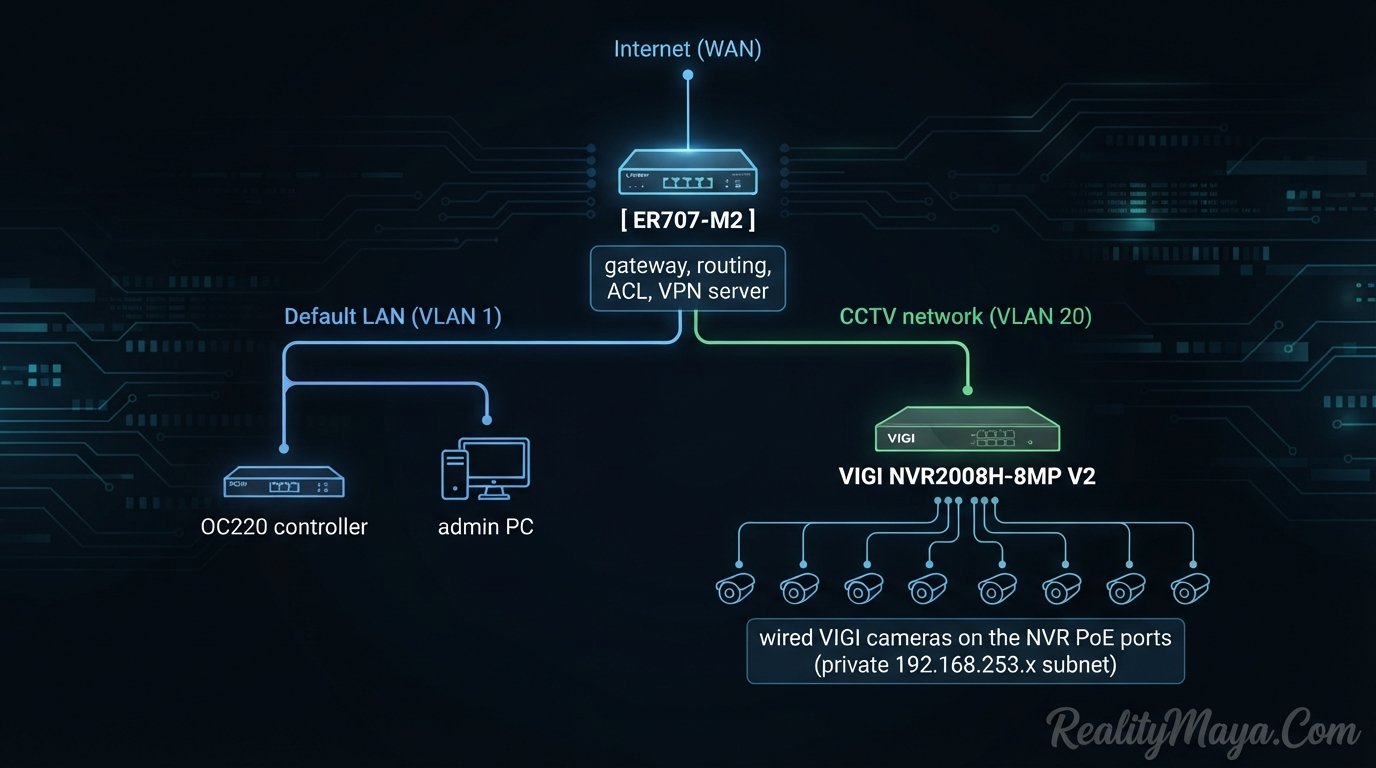
To secure a CCTV network, make the recorder the only device that talks to the outside world and block everything else. That is easy to say and awkward to build, because a camera system needs time sync, cloud access for remote viewing and a way for you to log in when you are away from the building. This guide builds it on one specific set of hardware: an Omada ER707-M2 gateway, an OC220 controller(if you have EAP or Switches manages locally) and a VIGI NVR2008H-8MP V2 with wired VIGI cameras. The recorder may reach NTP, the OC220 and VIGI Cloud, nothing more. You reach it from outside through a VPN on the ER707-M2.
Last reviewed: 22 November 2026. Menu paths follow Omada Controller 6.2 and later. Check labels against the firmware on your OC220.
How to secure a CCTV network: the design
Internet (WAN)
     |
[ ER707-M2 ]   gateway, routing, ACL, VPN server
     |
     +-- Default LAN (VLAN 1)   OC220 controller, admin PC
     |
     +-- CCTV network (VLAN 20) VIGI NVR2008H-8MP V2
                                   |
                                   +-- wired VIGI cameras on the NVR PoE ports
(private 192.168.253.x subnet)| Network | Example subnet | Devices |
|---|---|---|
| Default LAN (VLAN 1) | 192.168.0.0/24 | OC220, your admin PC |
| CCTV (VLAN 20) | 192.168.20.0/24 | VIGI NVR only |
| NVR camera subnet | 192.168.253.0/24 | Cameras on the NVR PoE ports |
| VPN clients | 192.168.50.0/24 | Your phone and laptop when you connect remotely |
The subnets are examples, so replace them with yours. The NVR2008H-8MP V2 has eight PoE+ ports that run at 10/100 Mbps, a 90 W PoE budget and one gigabit LAN port. That layout matters, because the cameras plug into the recorder and not into your network.
Why the ACL only has to control the NVR
VIGI NVRs include a feature called Network Isolation. It splits the built-in PoE ports and the LAN port into separate subnets. Cameras on the PoE ports get addresses from a private range, 192.168.253.x by default, and TP-Link says this stops them from communicating directly with the main LAN while recording and live view through the NVR keep working. A ping from a PC on the NVR LAN to a camera fails, which is how you know it works.
There is one more switch to know about. When PoE Access to Internet is enabled, the cameras reach the network through the NVR’s NAT. When it is disabled, they can only talk to the NVR. For the strictest setup, leave it off. If you turn it on, camera traffic leaves the NVR with the NVR’s address, so the rules below treat the cameras the same as the recorder.
Step 1: Turn on Network Isolation on the NVR
- Add each camera to the NVR using the TP-Link protocol. Network Isolation works with cameras added that way. Confirm each one shows as Connected under Settings > Camera > Device Access.
- Go to Settings > Network > Network Isolation and enable it. If the menu is missing, update the NVR firmware first.
- Keep the default internal IP, or change it to a range that does not clash with your LAN, then leave PoE Access to Internet off.
- Save. The NVR restarts, then reassigns the cameras to the isolated subnet. After the restart, check Settings > Camera > Device Access to confirm the new addresses.
With isolation on, you add and view cameras through the NVR. Omada’s own documentation notes that remote access to individual cameras is unavailable when Network Isolation is enabled, so manage the NVR in VIGI Cloud and the VIGI app rather than each camera.
Step 2: Create the CCTV network and move the NVR into it
- In Omada Controller, go to Network Config > Network Settings > LAN and create a network named CCTV with VLAN 20 and a /24 subnet. Turn on the DHCP server for it.
- Open the ER707-M2 device page, go to Ports, and edit the LAN port the NVR plugs into. Set its native network to CCTV. Omada Gateway ports are in the default network until you change them, and a port keeps one native network.
- Give the NVR and the OC220 DHCP reservations so their addresses never change. ACL rules are much easier to read when the addresses are fixed.
- Set the NVR’s DNS server to the CCTV network gateway address, which is the ER707-M2. That keeps the recorder’s lookups under your control and avoids an extra permit rule.
Step 3: Create the IP groups and the VIGI Cloud domain group
Go to Network Config > Profile > Groups. Create IP groups for the NVR, the OC220 and your admin PCs. Then create a Domain Group named VIGI-CLOUD, because the ER707-M2 supports FQDN-based access control and the Gateway ACL lets you match a domain group.
TP-Link publishes the domains that VIGI devices contact. This list is for the Asia Pacific region, which uses the aps1 prefix, and comes from the VIGI VMS Cloud connection page that TP-Link updated on 29 September 2026:
| Service | Domain | Port |
|---|---|---|
| Platform Cloud | n-device-entry-sur.tplinkcloud.com id.tplinkcloud.com aps1-vms.tplinkcloud.com | TCP 443, 6443, 50443 |
| Event reporting and firmware | vms-api.i.tplinkcloud.com aps1-vms-api.i.tplinkcloud.com aps1-vms-api.i.tplinknbu.com | TCP 443 |
| Cloud Relay (remote streaming) | aps1-cipc-api-internal.tplinknbu.com | TCP 443 |
| Firmware downloads | download.tplinkcloud.com | TCP 443 |
Add AI Connector and Cloud Backup domains only if you use those features. TP-Link has changed these lists before, so compare your group with the current article whenever VIGI Cloud stops working after a firmware update.
Step 4: Config the ACL rules
Go to Network Config > Traffic Management > ACL > Gateway ACL and create the rules below. Three behaviours decide the design. A Gateway ACL has an implicit permit, so traffic that matches no rule is allowed. Rules are checked in order and the first match wins. And Gateway ACLs are stateful, so the default Auto setting matches new, established and related connections.
| # | Policy | Direction | Source | Destination | Notes |
|---|---|---|---|---|---|
| 1 | Permit | LAN to LAN | ADMIN-PC group | NVR | Local access for you. |
| 2 | Permit | LAN to WAN | NVR | Any, UDP 123 | NTP only. |
| 3 | Permit | LAN to WAN | NVR | VIGI-CLOUD domain group, TCP | Port Any is fine because the destination is a group. |
| 4 | Deny | LAN to LAN | CCTV network | All other networks (select the default LAN and any network you add later) | States Type Manual, Match State New only. |
| 5 | Deny | LAN to LAN | Default LAN | CCTV network | States Type Manual, Match State New only. |
| 6 | Deny | LAN to WAN | CCTV network | Any | Closes every other outbound path. |
Two settings in that table are easy to get wrong. First, rules 5 and 6 use a Manual states type with only Match State New. A deny rule on Auto can also match the replies of connections you allowed, such as the NVR answering your admin PC, and your access would break. Denying only new connections blocks the NVR from starting traffic toward your LAN while replies still pass. Second, leave Bi-Directional off everywhere except rule 1. The option creates a mirrored rule with source and destination swapped, and on the deny rules that would block you as well.
Keep every permit above every deny. Drag the rules into order or edit the index numbers. If the NVR uses a public DNS server instead of the gateway, add a permit for DNS to that server above rule 7, or domain lookups will fail. Enable the Log option on the deny rules if you have remote logging configured, so you can see which rule matched when something breaks.
Step 5: Set up VPN for remote access
The ER707-M2 can act as a VPN server for IPsec, OpenVPN, L2TP, SSL VPN and WireGuard, and it supports 20 WireGuard tunnels. For one owner and a couple of admins, WireGuard or OpenVPN is the practical choice. Use the VPN section of Network Config to create the server, give it its own client subnet such as 192.168.50.0/24, and create one profile per device, so you can revoke a lost phone without touching anyone else.
Add a rule that permits the VPN client subnet to the NVR, and one that denies the VPN subnet to the CCTV network, placed below it. If you choose a VPN type that Omada lists as its own direction in the ACL form, use that direction. Once connected, open the NVR web page or the VIGI client at the NVR’s address. A VPN needs a public WAN address. If your internet provider puts you behind carrier-grade NAT, the connection will not reach the gateway, and you will need a public IP or another approach.
Step 6: Close the side doors
- Turn UPnP off on the ER707-M2 and on the NVR. The NVR supports UPnP, and an open UPnP service can publish ports without you noticing.
- Delete every port forward that points at the NVR or a camera. VPN and VIGI Cloud replace them.
- Change every default password, and use a different long password for the NVR, the cameras, the OC220 and the VIGI Cloud account.
- Update the NVR, camera and OC220 firmware. TP-Link published CVE-2026-1457 for the VIGI C385, a buffer overflow in the web API that can allow code execution after authentication, and it affects firmware older than 3.1.1 Build 251124 Rel.50371n. For the OC220 V2, the support page lists firmware 2.6.25 Build 20261013 as the newest release at the time of writing.
- Watch the Omada security bulletin page for controller and gateway advisories.
Step 7: Test the result
| Test | Expected result |
|---|---|
| Admin PC opens the NVR web page | Works |
| Another device in the default LAN opens the NVR | Fails |
| NVR shows online in the VIGI app over mobile data | Works |
| NVR clock stays correct after a reboot | Works |
| VPN client on mobile data opens the NVR | Works |
| VPN client opens the OC220 or a camera address | Fails |
| Deny rule log shows hits when you test | Matches rules 5, 6 or 7 |
If VIGI Cloud shows offline after you enable the deny rules, check the domain group first, then DNS, then the extra ports 6443 and 50443. A permit placed below a deny never fires, so check the order before you change anything else.
PDPA note for Malaysian organisations
Footage that identifies people is generally treated as personal data under Malaysia’s PDPA, so protecting the recorder is part of your security duty. Since 1 June 2025, data controllers must notify the Personal Data Protection Commissioner as soon as practicable once they have reason to believe a personal data breach has occurred. Ask your data protection officer or legal adviser how this applies to your premises. This post is not legal advice.
FAQ
Do the cameras need their own ACL rules?
Not with Network Isolation on and PoE Access to Internet off. The cameras sit in a private subnet behind the NVR and can only talk to it, so the NVR is the only device that crosses your network.
Can I do this without a separate VLAN?
Yes. Use an IP group for the NVR as the source and destination in every rule instead of the CCTV network. A VLAN gives a cleaner boundary and simpler rules, but a reserved NVR address with an IP group works on a flat network.
Why does a deny rule break my access to the NVR?
A deny rule on the default Auto state can also match the replies of connections you allowed. Set the deny rules to Manual and match only the New state, and keep the permits above them.
Should I port forward the NVR for remote viewing?
No. Port forwards put the recorder on the internet. Use VIGI Cloud for viewing through TP-Link’s relay, and use the VPN when you need the NVR’s own web interface.
Does the OC220 have to manage the NVR?
No. Adopting the NVR into the controller is your choice. If you do not, delete rule 1 and keep the NVR away from the OC220 entirely.
Conclusion
A secure CCTV network built on this hardware comes down to five settings: Network Isolation on the NVR, the NVR in its own CCTV network, permit rules for the OC220, NTP and the VIGI Cloud domain group, deny rules set to match new connections only, and a VPN instead of port forwards. If an admin PC can open the NVR, a staff laptop cannot, and the NVR still shows online in the VIGI app, the isolation works.
Sources
- TP-Link: How to Configure Network Isolation on VIGI NVR
- TP-Link: How Do VIGI Devices and Clients Connect to VIGI VMS Cloud
- Omada: How to Configure Gateway ACL
- TP-Link: ER707-M2 datasheet
- TP-Link: VIGI NVR2008H-8MP V2 datasheet
- TP-Link: VLAN configurations of the LAN ports on Omada Gateway in Controller mode
- Omada: OC220 support and firmware
- Omada: Understanding NVR Management Limitations in Fusion Pro
- TP-Link advisory: VIGI C385 authenticated RCE (CVE-2026-1457)
- Omada security bulletins
- Future of Privacy Forum: Malaysia’s data protection and AI ethics frameworks